

ML/AI, CV
Exploring the HSV color space with Balloons
Point a camera at a bunch of hot air balloons, ask a computer to find the pink one, and you run straight into the problem that makes colour harder than it looks. The pink balloon in full sun and the same pink balloon in shadow are, as far as RGB is concerned, two completely different colours.
The problem with RGB
In the Blue/Green screen effect post we picked out a background by thresholding red, green and blue channels directly. That worked because a studio green screen is lit deliberately flat - the whole backdrop is one even shade.
Outdoors, nothing is evenly lit. Take a single pink balloon photographed at midday. The sunlit side might read (230, 90, 140) in RGB. The shaded side of the same balloon reads something like (120, 45, 75).
Look at those two triples. Every one of the three numbers changed, and roughly halved. There is no threshold you can write on red, green and blue that includes both without also swallowing half the sky.
Here is the thing though: the ratios barely moved. Red is about two and a half times green in both. That is the clue. Brightness changed; the colour itself did not.
Convert those same two pixels to HSV and the point lands hard. The sunlit one is (169, 155, 230); the shaded one is (168, 159, 120). The hue moved by one. The value dropped by 110.
What HSV does differently
RGB describes a colour by how much of three lights you mix. HSV describes it the way a person would - what colour is it, how vivid is it, how bright is it.
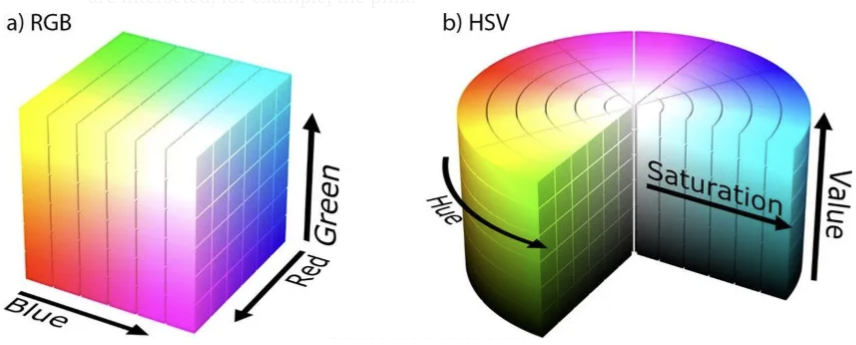
The picture is the whole idea. RGB is a cube with red, green and blue on the three axes; "brighter" means moving diagonally through the middle of it, changing all three numbers at once. HSV is a cylinder, and the three properties are pulled apart onto their own axes:
- Hue - the angle around the cylinder. Which colour it is: red, orange, green, cyan, and back round to red again.
- Saturation - the distance from the centre out to the wall. How vivid it is. Centre is grey, wall is a fully vivid colour.
- Value - the height. How bright it is. The floor is black, whatever the other two say.
Now go back to that pink balloon. Sunlit and shaded, its hue is almost identical. Nearly all of the change went into Value, and a little into Saturation. Threshold on hue and the shadow stops mattering, because you have stopped asking "how bright is this pixel" and started asking only "what colour is it".
That is the entire trick. Everything below is mechanics.
Reading the image in
import cv2
import numpy as np
import matplotlib.pyplot as plt

%matplotlib inline

# OpenCV reads images as BGR, matplotlib expects RGB
image = cv2.imread('images/balloons.jpg')
image = cv2.cvtColor(image, cv2.COLOR_BGR2RGB)

print('Dimensions:', image.shape)
plt.imshow(image)
That cvtColor on the second line catches people out constantly. cv2.imread hands back the channels in blue, green, red order, not red, green, blue. Skip the conversion and matplotlib will show you a photo with the reds and blues swapped - an unmistakable teal-and-orange look that is worth learning to recognise, because it means exactly one thing.
Looking at the channels separately
Before thresholding anything, it is worth seeing what the two colour spaces actually contain. Split the RGB channels first:
r = image[:, :, 0]
g = image[:, :, 1]
b = image[:, :, 2]

f, ax = plt.subplots(1, 3, figsize=(20, 10))
for axis, channel, name in zip(ax, (r, g, b), ('Red', 'Green', 'Blue')):
    axis.set_title(name)
    axis.imshow(channel, cmap='gray')
Each channel comes out as a greyscale image where bright means "a lot of this colour here". The thing to notice is that the sky is bright in the blue channel and the balloons are bright in red - but so is every sunlit surface in the frame. Brightness is smeared across all three.
Now the same for HSV:
hsv = cv2.cvtColor(image, cv2.COLOR_RGB2HSV)

h = hsv[:, :, 0]
s = hsv[:, :, 1]
v = hsv[:, :, 2]

f, ax = plt.subplots(1, 3, figsize=(20, 10))
for axis, channel, name in zip(ax, (h, s, v), ('Hue', 'Saturation', 'Value')):
    axis.set_title(name)
    axis.imshow(channel, cmap='gray')
The Value channel looks like a black-and-white photograph, which is precisely what it is - all the brightness, none of the colour. And the Hue channel looks strange and flat, with each balloon a fairly uniform tone regardless of which side of it the sun is on. That flatness is the property we are about to exploit.
The OpenCV hue range gotcha
Before writing a threshold, one number needs stating plainly, because getting it wrong is the single most common way this goes sideways.
Hue is an angle, so it naturally runs 0-360 degrees. OpenCV halves it and stores 0-179, so that it fits in one unsigned byte. Saturation and Value are stored 0-255.
| Channel | Textbook range | OpenCV range |
|---|---|---|
| Hue | 0-360 | 0-179 |
| Saturation | 0-100% | 0-255 |
| Value | 0-100% | 0-255 |
So a colour picker telling you a balloon sits at hue 320 means 160 in OpenCV. Feed 320 into inRange and you will match nothing at all, silently - an all-black mask and no error message.
Thresholding in RGB, and watching it fail
Let us try the naive approach first, because the failure is instructive. Pick bounds for the pink balloon:
lower_pink_rgb = np.array([180, 0, 100])
upper_pink_rgb = np.array([255, 255, 230])

mask_rgb = cv2.inRange(image, lower_pink_rgb, upper_pink_rgb)

masked = np.copy(image)
masked[mask_rgb == 0] = [0, 0, 0]
plt.imshow(masked)
cv2.inRange returns a mask that is 255 where every channel falls inside its bounds and 0 everywhere else. Both bounds are inclusive.
This gets the sunlit face of the balloon and abandons the rest. Raise the lower bound to catch the shadowed side and you start pulling in the ground, other balloons, anything mid-toned. There is no setting that works, and that is not a tuning problem - it is the colour space being wrong for the job.
Thresholding on hue instead
Same image, same goal, one channel:
# pink/magenta sits near the top of OpenCV's hue range
lower_pink_hsv = np.array([145,  60,  60])
upper_pink_hsv = np.array([175, 255, 255])

mask_hsv = cv2.inRange(hsv, lower_pink_hsv, upper_pink_hsv)

masked = np.copy(image)
masked[mask_hsv == 0] = [0, 0, 0]
plt.imshow(masked)
The balloon comes out whole, shadow included.
Read what those bounds are actually saying, because the asymmetry is the point:
- Hue 145-175 is doing the real work. It is narrow and specific: this colour and no other.
- Saturation 60-255 rules out washed-out greys. Below about 60 a pixel is closer to grey than to any colour, and its hue is unreliable - meaningless, even.
- Value 60-255 rules out near-black pixels, whose hue is likewise noise.
The upper bounds on Saturation and Value are wide open at 255. That is deliberate. We are saying "any vividness, any brightness, as long as it is this colour" - which is exactly the sentence RGB had no way to express.
Red, and the wrap-around problem
One colour needs special handling. Hue is an angle, and red sits at the seam where the cylinder joins - it occupies both the very bottom of the range and the very top:
# a single range cannot span the 179 -> 0 wrap
lower_red_1 = np.array([  0, 100, 60])
upper_red_1 = np.array([ 10, 255, 255])

lower_red_2 = np.array([170, 100, 60])
upper_red_2 = np.array([179, 255, 255])

mask_red = cv2.bitwise_or(
    cv2.inRange(hsv, lower_red_1, upper_red_1),
    cv2.inRange(hsv, lower_red_2, upper_red_2),
)
Ask for inRange(hsv, [170, ...], [10, ...]) and you get an empty mask, because inRange tests lower <= value <= upper per channel and no number is both above 170 and below 10. Two masks combined with bitwise_or is the standard fix. Every other colour sits in one contiguous band and needs only one range.
Finding the numbers for your own image
Rather than guessing, sample the pixel you care about:
# a point inside the balloon you want - (row, column)
row, col = 220, 310

print('RGB at that point:', image[row, col])
print('HSV at that point:', hsv[row, col])
Print that for a few points across the object - one in sun, one in shadow - and the pattern from the top of this post shows up in real numbers. The RGB triples will look unrelated. The hue values will land within a few units of each other.
Take the hue you get, allow perhaps 10-15 either side, leave Saturation and Value wide with a floor around 50-60, and you have a working threshold. Tighten from there if it grabs too much.
Watching it live
Static images only take you so far. The fastest way to build an intuition for hue is to hold objects in front of a camera and watch the mask update:
import cv2
import numpy as np

cap = cv2.VideoCapture(0)

# trackbars to explore the ranges by hand
cv2.namedWindow('controls')
cv2.createTrackbar('H low',  'controls',   0, 179, lambda v: None)
cv2.createTrackbar('H high', 'controls', 179, 179, lambda v: None)
cv2.createTrackbar('S low',  'controls',  60, 255, lambda v: None)
cv2.createTrackbar('V low',  'controls',  60, 255, lambda v: None)

while True:
    ok, frame = cap.read()
    if not ok:
        break

    hsv_frame = cv2.cvtColor(frame, cv2.COLOR_BGR2HSV)

    lower = np.array([
        cv2.getTrackbarPos('H low', 'controls'),
        cv2.getTrackbarPos('S low', 'controls'),
        cv2.getTrackbarPos('V low', 'controls'),
    ])
    upper = np.array([cv2.getTrackbarPos('H high', 'controls'), 255, 255])

    mask = cv2.inRange(hsv_frame, lower, upper)

    cv2.imshow('camera', frame)
    cv2.imshow('mask', mask)

    if cv2.waitKey(1) & 0xFF == ord('q'):
        break

cap.release()
cv2.destroyAllWindows()
Note this one converts with COLOR_BGR2HSV, not COLOR_RGB2HSV. Frames come off the camera as BGR and go straight to cv2.imshow, which also expects BGR, so there is no reason to detour through RGB here.
Narrow the hue band until only one object survives, then walk it in and out of a shadow. The mask holds. Do the same experiment with an RGB threshold and it will not.
Things that will bite you
- Hue is 0-179 in OpenCV, not 0-360. Halve any value a colour picker gives you.
inRangecannot wrap around. Red needs two ranges combined withbitwise_or.- Grey and near-black pixels have meaningless hue. Always set a Saturation and Value floor, or the mask will speckle across every shadow in the frame.
cv2.imreadgives BGR. Convert before handing an image to matplotlib; do not convert before handing it tocv2.imshow.- White objects have no useful hue at all. They sit on the cylinder's centre line, where the angle is undefined. Threshold those on low Saturation plus high Value instead.
- HSV fixes shade, not colour casts. Golden-hour light or a white balance shift moves hue itself, and no threshold survives that. It buys you robustness to brightness, which is most of the problem, but not all of it.